Ballistic Magazine
  • Guns
    • Handguns
    • Rifles
    • Class III & More
  • Gear
    • Accessories
    • Ammo
    • Knives
    • Suppressors
  • News
  • Lifestyle
    • Culture
    • People
    • Podcasts
    • Rides
    • Survival
    • Tactics & Training
  • VIDEOS
  • Subscribe
No Result
View All Result
Ballistic Magazine
No Result
View All Result
 
New Year, New FREE GUN FRIDAY! Enter to WIN the Smith & Wesson and Black Hills package.

DIY Shooting Shed: 10 Steps to Building Your Own Shooting Shed

J. Wayne Fears by J. Wayne Fears
February 16, 2021
in Lifestyle, Tactics & Training
0
DIY Shooting Shed, Shooting Bench Cover
483
SHARES
2.6k
VIEWS
Share on FacebookShare on Twitter
It is great to have a permanent shooting bench on your property such as this one. But it’s even greater when it is covered with a strong shed roof, allowing you to shoot in all types of weather and protect the bench at the same time.
Top View
Side View

The first step we took was to build a temporary, perfectly square template out of the roofing slats. We marked the exact location of the new corner posts with spray paint.
We elected to rent a one-man auger to speed up the hole-digging process. It was well worth it.
Care must be given to set the corner posts exactly the correct distance apart. Use a level to make sure they are plum.

Use a string and string level to determine where to cut the corner posts.
For extra strength, use ¼-inch lag bolts to attach the girts to poles and to attach the rafters to girts.
The shooting shed is ready for the slats to be attached to the rafters.

Side braces and slats are in place, and the metal roofing panels are being attached.
The completed shooting shed is ready for paint and ground treatment.
When complete, the roof will offer shade on hot days, protection from rain and will add years of life to your shooting bench.

The shooting shed floor was completed with crusher-run gravel around the existing concrete pad. This gives a mud-free space around the bench when it is raining and makes brass recovery easy.

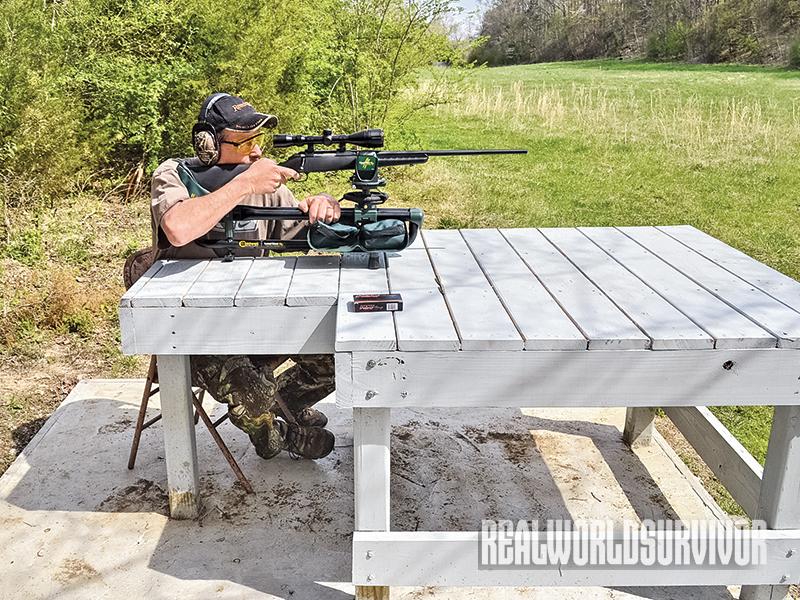
You finally got around to building a permanent shooting bench in the back 40 that now gives you a sturdy platform to sight-in your rifles, check handloads and simply have fun doing some serious plinking. However, after a few months, you notice that even though you made the bench from treated materials, it’s showing some signs of wear due to exposure to the weather. At the same time, you wish you had shade over the bench during the hot months. It would also be nice to have a roof over the bench so when it’s raining, the shooting doesn’t stop. This is where a DIY shooting shed comes in handy.

DIY Backyard Shooting Range, clearing land, bulldozer
RELATED STORY

How to Build Your Own DIY Backyard Shooting Range for Under $2,000

A DIY Shooting Shed

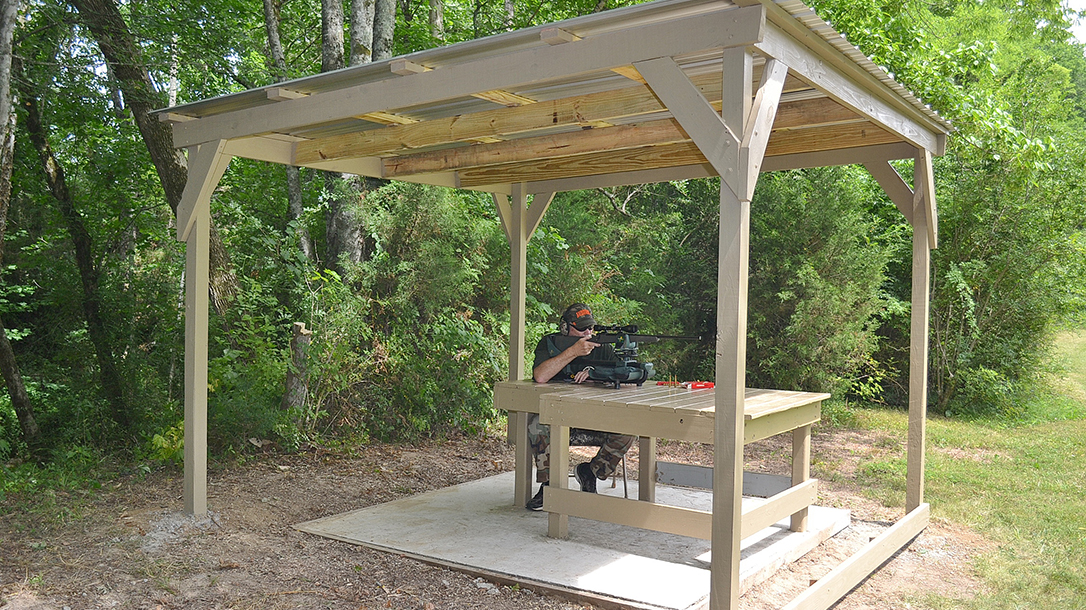
My sons and I went through the same wish list soon after we built our permanent shooting bench on our farm, and after some discussions, we decided we needed a strong shed roof over our large bench that would give us, and the bench, protection from the sun and rain.

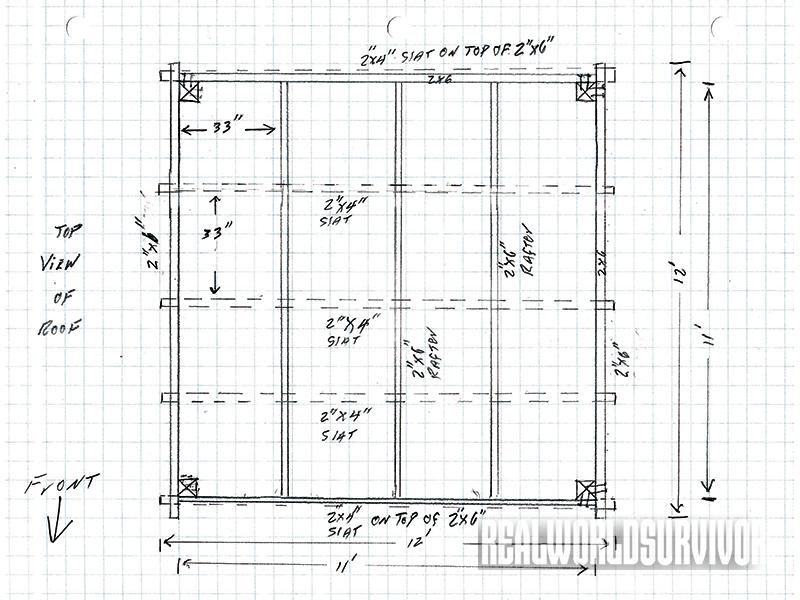
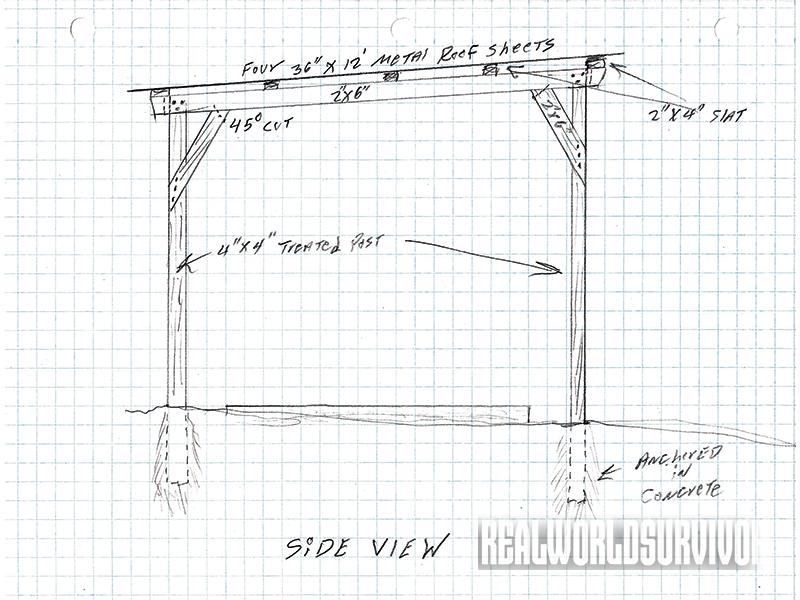
Since snow accumulation in our region is not a problem and a steep pitch is not required, we decided on a simple, gentle-sloping, shed-style roof. We had already poured an 8-by-8-foot pad around the bench to give us a clean place to sit and shoot, so we decided on building a 12-by-12-foot shed roof centered over the bench and pad.

We knew that if the roof was to be a perfect 12-foot square, with a 6-inch overhand on all sides, the four 4×4 corner posts must be placed 11 feet apart with the center of the square being in the center of the existing shooting bench. My son Jeff came up with a simple template he made from four of the 12-foot 2x4s we had purchased to use as slats. It was a square that measured exactly inside 11 feet by 11 feet.

Making the Cuts

We found the center of the shooting bench and sat the 11-by-11-foot square over the bench and concrete pad, with the template center matching it. With the 11-by-11-foot square on the ground, we painted the ground orange with spray paint in each corner. That would be the location of each of the corner posts. We lifted the 2×4 square off and disassembled it so the boards could be used as slats.

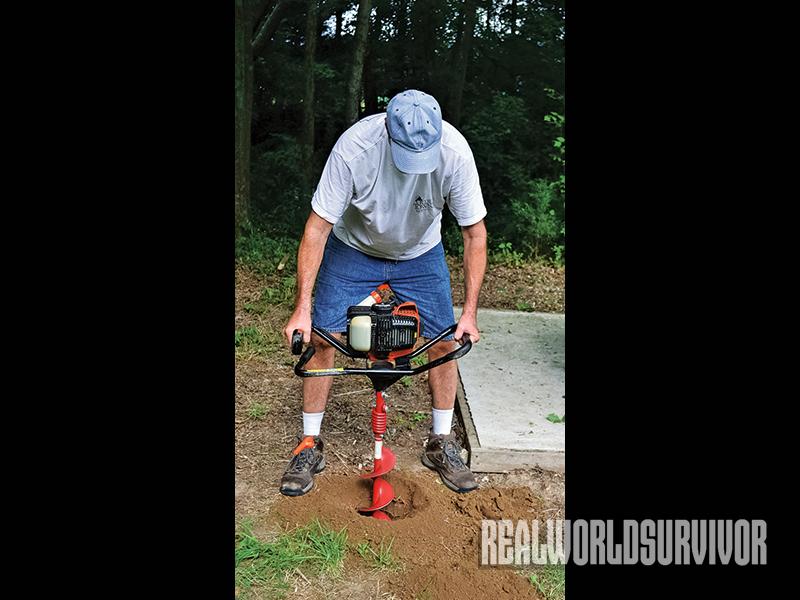
Since we wanted each 4-inch-by-4-inch-by-12-foot corner post to be in the ground 24 inches and anchored in concrete, we rented a one-man power auger. It gave us clean holes and saved a lot of digging time as the site had lots of roots and rocks in the ground.

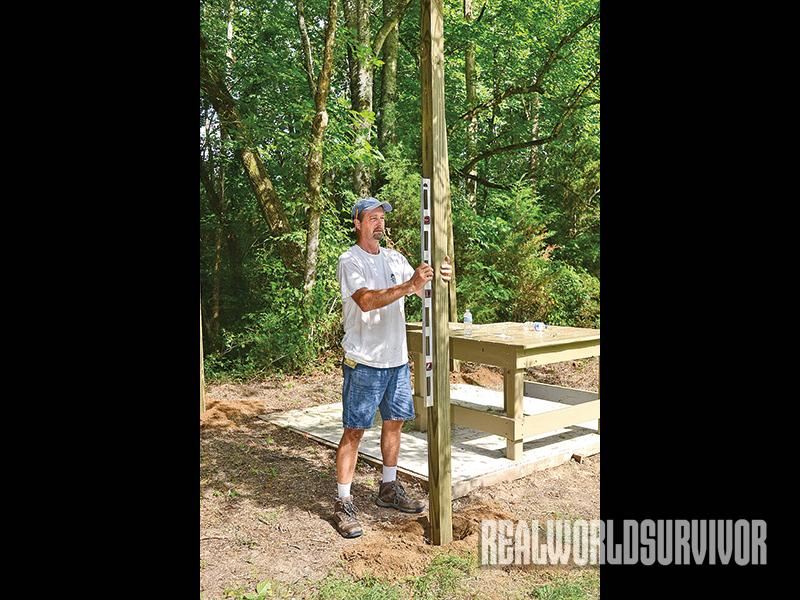
Once we dug the holes to the desired depth, we used a level and steel tape to position each post at exactly 11 feet apart, outside to outside, and to be perfectly plum. Then we poured in the Quikrete and water, and again checked the post, both at ground level and at the top, for distance and to be plum. Satisfied with the post positioning, we gave the Quikrete two days to set up.

With the four-corner posts solidly in place, we were ready to cut the post to length. Since the site sloped about 1 foot from back of the shed site to the front, we decided to cut the two back corner posts at 8-foot lengths, and to cut the front post at a place that would give us an 8-inch roof pitch from front to back. We determined this by marking both back posts at 8 feet. Then we pulled a string with a string level attached to the level point on the two front posts. We marked this point on each post and measured 8 inches above that, making this the cut point. Using a chainsaw, we cut all four poles to length.
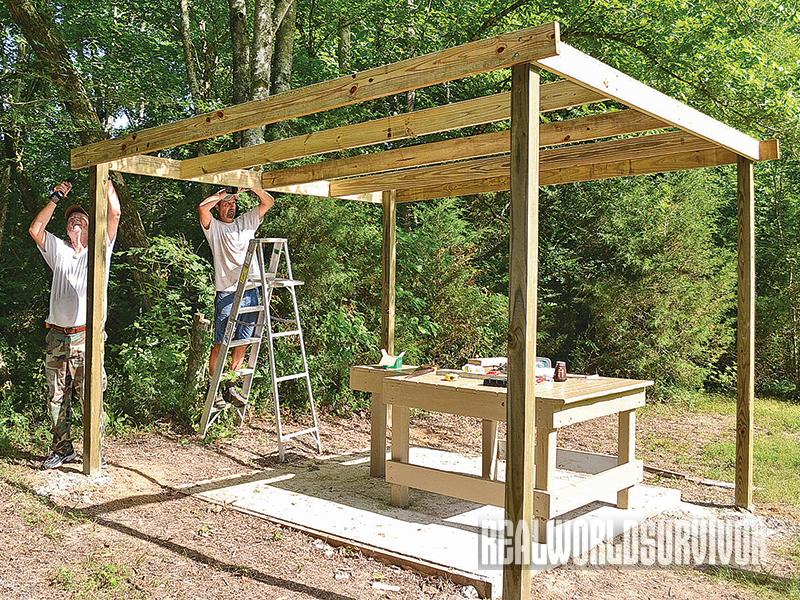
Placing the Girts

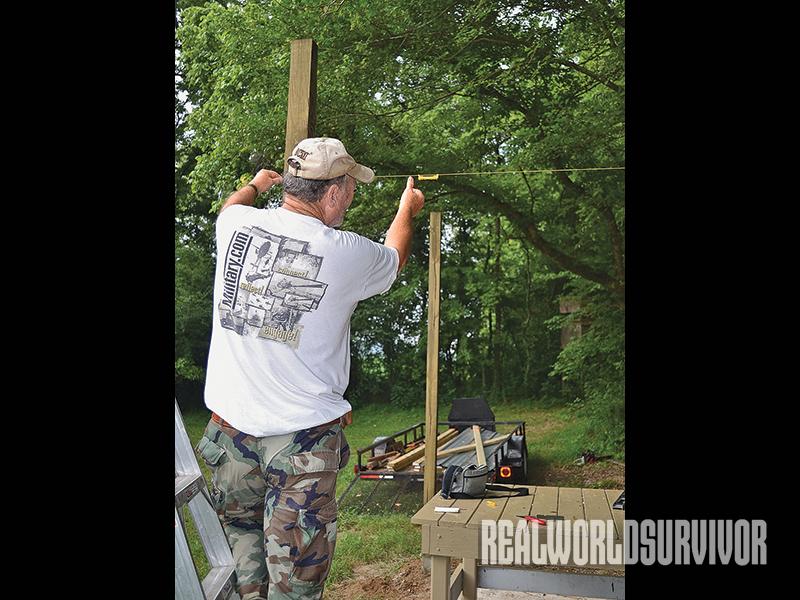
Next, using ¼-inch lag bolts and washers, we attached a 2×6 board measured out to 11 feet, 8 inches; it ran from the higher front post to the lower back post on the outside. We positioned the board so that it was just slightly higher that the highest point on top of the post. It gave us 4 inches of overhang in the front and back of the shed to support a rafter near the edge of the metal roof. Across the two front posts and the two back posts we attached, on the outside, using ¼-inch lag bolts, a 2×6 board cut to 11 feet in length. With this done, we had strong girts all around the roof to attach the rafters and slats.

Since we get some occasional strong winds at our range, we elected to brace the girts to each post. We did this at each corner from two directions with 2-by-6-by-30-inch boards cut at 45-degree angles and attached with ¼-inch lag bolts. This also braced the shed roof from any side-to-side motion.

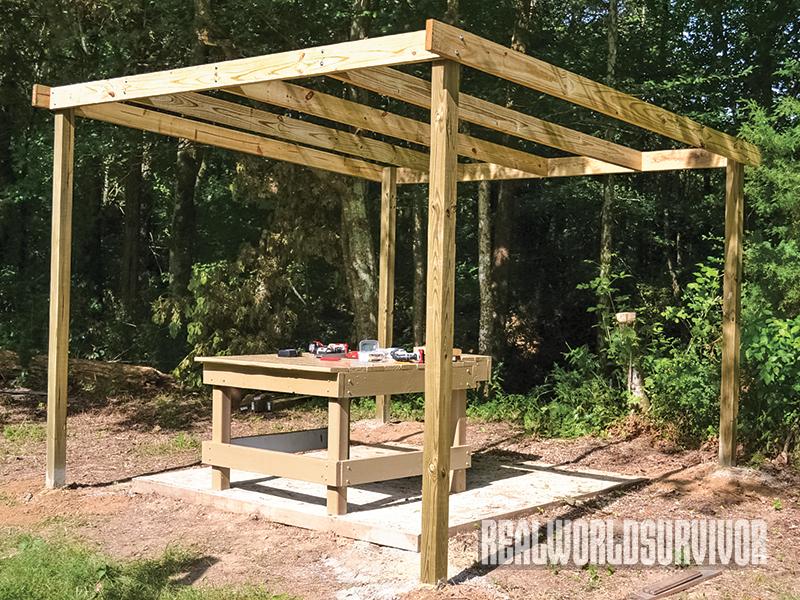
With the girts securely fastened in place, we were ready to cut and bolt in place the three inside 11-foot 2×6 rafters. Since the side girts would serve as the outside rafters, we only needed three interior rafters (with 33-inch, on-center spacing). We attached these to the front and rear girt using ¼-inch lag bolts.

For strength, we elected to use treated 12-foot 2×4 slats to which we attached the metal roofing. We also placed these five slats with on-center spacing of 33 inches. We attached them to the rafters with 3½-inch exterior-grade deck screws. Lastly, we needed a slight angular cut on each rafter to get the rafters to fit the girts. This angle will depend upon the pitch you give the roof.
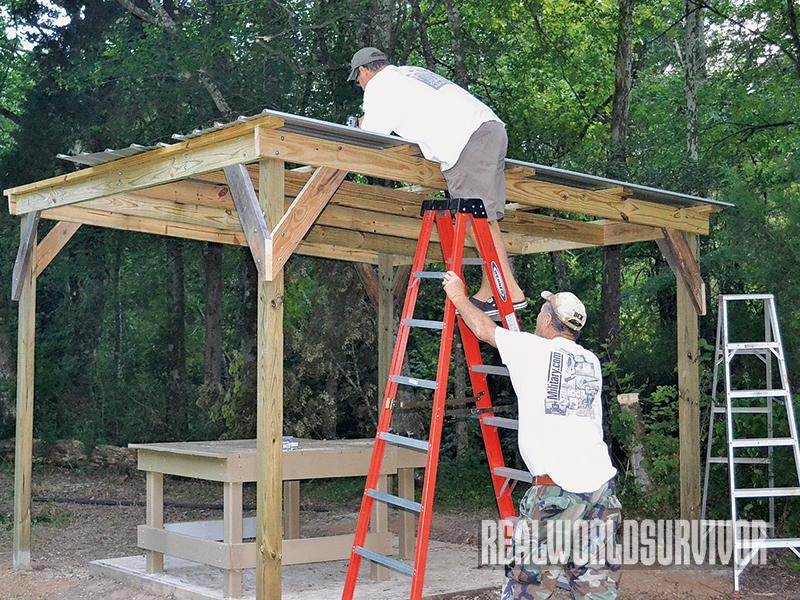
Raise the Roof

The final step in completing the shooting shed was to place the metal roofing panels to the slats using 1¼-inch washer roof screws. As the metal roofing went up, we were glad we started with well-placed posts and careful measurements on the girts and slats, as the metal panels fit exactly and gave us a 6-inch overhang as we had planned.

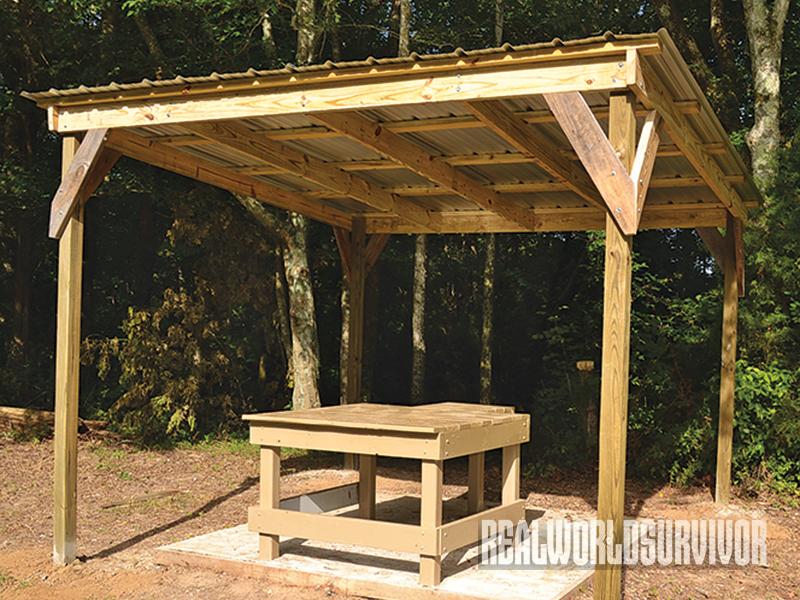
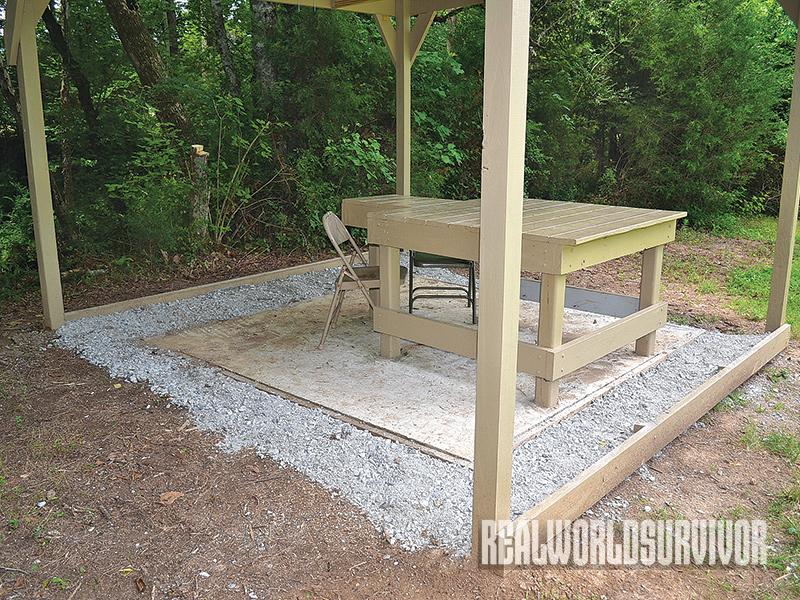
There are several options to consider for the ground cover under a shed roof for a shooting bench. It can be left as bare ground, it can be a concrete floor or, in our case, since we already had a square, 8-foot concrete pad in place, you can fill it in with crusher-run gravel. It has been my experience that even with a roof, if there is much slope, rain will cause the shooting shed to be a muddy mess, so the concrete or gravel option is usually best. Also, it makes the recovery of brass and cleaning up much easier.

Under our shooting shed, we filled in around the concrete pad with crusher-run gravel and it works well. We are also in the process of painting all the wood in our shed not only to give it a better look, but also to help keep carpenter bee damage to a minimum.

Materials List for Your DIY Shooting Shed

quikrete

Since the shed sees all types of weather, all wood products selected were treated, exterior-grade products. All screws and lag bolts were exterior grade.

  • (4) 4-inch-by-4-inch-by-12-foot treated posts
  • (9) 2-inch-by-6-inch-by-12-foot treated boards
  • (5) 2-inch-by-4-inch-by-12-foot treated boards
  • (4) 36-inch-by-12-foot galvanized sheet metal roof
  • 1 box ¼-inch-by-3½-inch lag bolts and washers
  • 1 box 3½-inch deck screws
  • (4) 50-pound bags of Quikrete
  • 1 box 1¼-inch washer roof screws
  • 1 can of orange spray paint

Tools It Takes

saw-tool
  • Porter Cable 20V ½-inch drill/driver
  • Oregon 40V chainsaw
  • Porter Cable 20V impact drill/driver, ratchet
  • Porter Cable drill bit set with Phillips-head driver
  • Black & Decker Workmate portable vise/table
  • Porter Cable circular saw
  • Porter Cable reciprocating saw
  • Long level
  • String level and masonry string
  • Safety glasses
  • 25-foot steel tape
  • Stepladders  • Hammer
  • One-man power auger (rented)
  • Speed square
  • Leather gloves
  • Carpenter’s pencil

Project Overview

  • Skill Level: Intermediate carpentry skills
  • Required Labor: Two
  • Estimated Cost: $400
  • Completion Time: Three to four days (includes time for concrete set)

Didn't find what you were looking for?

CLICK HERE FOR COMMENTS

RELATED POSTS

Free Public Shooting Range in Every National Forest Thanks to the Range Access Act.

Range Access Act: A Free Public Shooting Range in Every National Forest

The Riflespeed Gas Control System gives user-control in the field.

Riflespeed Gas Control System: Is This the Ultimate Recoil Management?

Gunsmith disasters can ruin more than just your firearm.

Mister Manners: Gunsmith Disasters Can Cost Big Money–And More!

What to do during a negligent discharge on the range.

Mister Manners: You’re Downrange Pasting Targets When Shots Are Fired

Load More

WATCH NOW: Night Shooter | Season 2

Discussion about this post

FEATURED POST

Ballistic's Best Reader's Choice Winners

Winners Announced: Ballistic’s Best Readers’ Choice 2022

The votes are in! We've counted the ballots, and we're excited and impressed by you, the...

Read more

TRENDING

7 new products announced ahead of shot show 2023.

New Guns & Gear Launched at SHOT Show 2023

A top-quality chassis gives you adjustability and other features you need to make your long-range shooting more accurate and fun. These 7 top rifle chassis do it with class.

7 Top Rifle Chassis That Add Class & Accuracy to Your Long-Range Shoot

Affordable Precision Rifles 2018

19 Affordable Precision Rifles That Won’t Break the Bank

We tested 12 compact and micro compact pistols to determine the best carry gun.

Best Concealed Carry Pistols 2022: Compacts & Micros Dominate

PICK A CATEGORY

TRAINING & TACTICS SPOTLIGHT

The SecureIt Retrofit Kit helps organize gun safe storage.

DIY Upgrade With the SecureIt Gun Storage Steel 6 Gun Safe Retrofit Kit

Like many of you, my gun collection consists of more than one gun. In fact, it is significantly more than...

SHOWCASE: TRAINING AND TACTICS

Clearing Corners Gunsite Academy lead

10 Key Tips to Clearing Corners That May Save Your Ass

Chris Hemsworth learns box breathing and other challenges in Limitless.

Use Box Breathing Like Chris Hemsworth to Calm Down & Make The Shot

zeroing in rifles and pistols

Zeroing Rifles & Pistols: Getting to & Maintaining Zeroed Sights

European Mount, DIY Euro Mount, Hunting, lead

How to Make a European Mount in 6 Steps

Team SIG Sauer's Lena Miculek fires a P365 and debates .380 vs 9mm.

VIDEO: SIG Sauer’s Lena Miculek Debates .380 Vs 9mm for Defense

Cross-Eye Dominant Shooting, pistol

The Guide to Cross-Eye Dominant Shooting

Follow this guide to better shooting on the move.

SHOOTING 101: 3 Keys to Getting Hits While Shooting on the Move

Understanding eye dominance and both eyes open shooting will help you get on target.

VIDEO: Understanding Eye Dominance for Better Accuracy & Speed

AMMO SPOTLIGHT

Hornady Subsonic 7.62x39 launches a 255-grain bullet.

Hornady Subsonic 7.62×39 Ammunition Launches 255-grain Bullet, Quietly!

Hornady just announced the release of a very interesting new load, one we think hunters will jump all over....

site logo
The Premier Firearms & Survival Magazine

Tactical

  • tactical-life.com

Magazines

  • Tactical Life
  • The Complete Book of Reloading
  • Guns of the Old West

Facebook

  • Tactical-Life Facebook
  • Guns of the Old West Facebook

Twitter

  • Tactical-Life Twitter

Self Defense

  • PersonalDefenseWorld.com

Magazines

  • Personal Defense World
  • Combat Handguns

Facebook

  • Personal Defense World Facebook
  • Combat Handguns

Twitter

  • Personal Defense World Twitter

Shooting Lifestyle

  • BallisticMag.com

Magazines

  • Ballistic Magazine

Facebook

  • Ballistic Magazine Facebook

Twitter

  • Ballistic Magazine Twitter

Alpha Lifestyle

  • SkillsetMag.com

Magazines

  • Skillset

Facebook

  • Skillset Magazine Facebook

Twitter

  • Skillset Magazine Twitter

Instagram

  • Skillset Magazine Instagram
  • Contact
  • Advertise
  • Subscribe
  • Terms Of Use
  • Privacy Policy
  • California Privacy Notice
  • Cookie Policy
© Athlon Outdoors, All Rights Reserved.
You use of this website constitutes and manifests your acceptance of our User Agreement, Privacy Policy, Cookie Policy, and awareness of the California Privacy Rights. Pursuant to U.S. Copyright law, as well as other applicable federal and state laws, the content on this website may not be reproduced, distributed, displayed, transmitted, cached, or otherwise used, without the prior, express, and written permission of Athlon Outdoors.

Manage your GDPR consents by clicking here. Manage your CCPA consents by clicking here.
No Result
View All Result
  • Guns
    • View All Guns
    • Handguns
    • Rifles
    • Class III & More
    • Sponsored
      • SIG Sauer
  • Gear
    • View All Gear
    • Accessories
    • Ammo
    • Knives
    • Suppressors
  • Videos
  • More
    • Free Gun Friday Sweeps
    • Sweepstakes
    • Subscribe
    • Contact Us
  • News
  • Lifestyle
    • View All Lifestyle
    • Tactics & Training
    • Survival
    • People
    • Podcasts
    • Rides

© 2023 JNews - Premium WordPress news & magazine theme by Jegtheme.